Hi-Vis with Your Logo: A Simple Guide for Small Construction & Trade Companies
Running a small crew means you're juggling everything: bids, schedules, gear, and safety. Branded hi-vis can seem like "nice to have" extras—until you see how much they help with safety, professionalism, and even getting more jobs.
This guide from Safety Apparel Zone breaks down how to put your logo on hi-vis gear the right way—without creating a compliance headache or blowing your budget.
We'll keep it practical, focused on small U.S. construction, road, and industrial teams.
Why put your logo on hi-vis in the first place?
Branded hi-vis does more than just look good. For small companies, it brings real advantages on and off the job site.
1. Your crew is instantly recognizable
On busy sites with multiple subs, inspectors, and delivery drivers, it's easy for workers to blend together. When everyone's wearing the same color vest, your logo is what sets your team apart.
That means:
- Foremen can spot your people faster
- GCs and inspectors can see your crew working
- Strangers are less likely to blend into your work area unnoticed
2. You look more professional to clients and GCs
When a crew shows up in mismatched gear, it sends a message—often the wrong one. Branded hi-vis signals that you:
- Take safety seriously
- Run an organized outfit
- Are big enough (and stable enough) to invest in your brand
For small contractors competing against larger firms, that visual trust can make a difference.
3. It's low-cost advertising you wear every day
Your team is on roadsides, job sites, and in customers' neighborhoods all week.
Every hi-vis shirt or vest with your logo is a moving billboard that can spark:
- Word-of-mouth referrals
- Call-ins from people who see your name and number
- Brand recognition the next time you bid a job
Done right, custom hi-vis from Safety Apparel Zone can pull double duty: PPE + marketing.
Step 1: Choose the right hi-vis base garments
Before you think about logos, you need the right base gear:
- Hi-vis shirts from our Hi-Vis Shirts Collection
- Safety vests from our Safety Vests Collection
- Hi-vis outerwear from our Hi-Vis Outerwear Collection
Make sure the garments are:
- ANSI/ISEA 107 compliant (look for Type and Class details)
- Appropriate for your work:
- Class 2 for most road and general construction
- Class 3 for night work, highways, or higher risk
Tip: Start with 1–2 core styles per category to keep ordering simple (e.g., one go-to shirt, one go-to vest, one go-to hoodie/jacket).
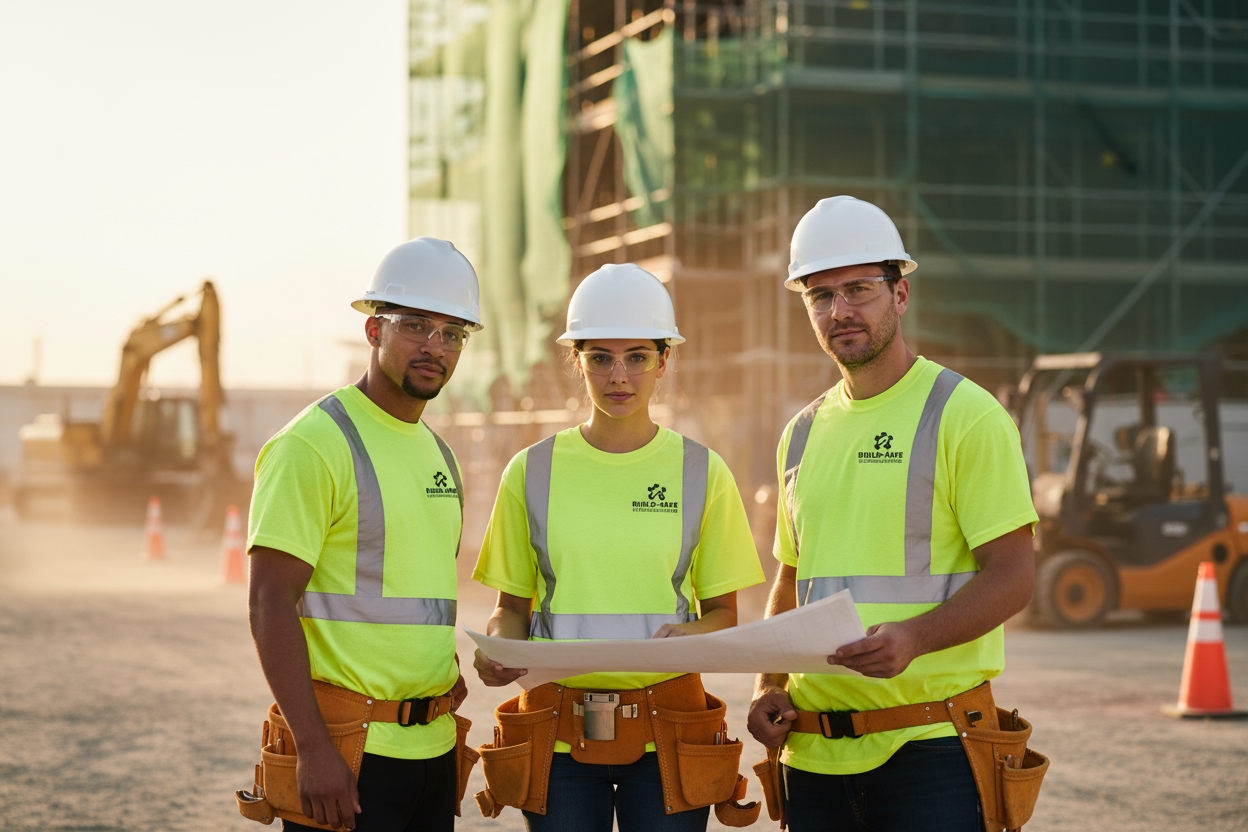
Step 2: Decide where to place your logo (without breaking compliance)
The big rule with custom hi-vis is:
Don't cover too much fluorescent or reflective area with your logo.
Here's how to do it right:
Common logo placements that usually work well
- Left chest (front) — Small to medium logo, stays above or between reflective tape strips on many designs
- Upper back — Across upper shoulder blades, keep it high enough not to cover rear reflective tape patterns
- On vests only — In some cases, it's better to print on the vest and leave shirts plain, so the vest carries your brand and visibility together
What to avoid
- Printing over large sections of reflective tape
- Huge solid blocks of dark ink in the middle of the chest or back
- Logos so big they "break up" the hi-vis pattern and make you harder to see
When in doubt, check the product photos and layout. A good rule of thumb: if your logo is about the size of a handprint on the chest or a large license plate on the back, you're usually in a safe range.
On our Custom Hi-Vis page you'll find guidance on logo placement options that keep you compliant.
Step 3: Pick the right print method for the job
Most small companies will use one of these methods:
Screen printing
- Great for medium to larger orders
- Durable and long-lasting
- Best if your logo is 1–3 solid colors
Heat transfer / vinyl
- Good for smaller runs or names/numbers
- Flexible placement
- Works well for adding company name or job roles ("Foreman", "Flagger", "Traffic Control")
Embroidery (more common on outerwear)
- Works well on jackets, hoodies, and caps
- Looks premium, very durable
- Avoid large, dense embroidery on thin, lightweight shirts (can feel heavy and hot)
At Safety Apparel Zone, we can advise on the best method based on quantity, garment type, and where your crew works (heat, cold, rain).
See more about options at our Custom Hi-Vis page.
Step 4: Figure out how many pieces per worker you really need
For most small crews, a good starting point is:
Per worker:
- 3–5 hi-vis shirts from our Hi-Vis Shirts Collection
- 1–2 branded vests from our Safety Vests Collection
- 1 hi-vis hoodie or jacket from our Hi-Vis Outerwear Collection for cold or wet weather
You can decide:
- Logo on vests only (easiest to manage, good for mixed weather)
- Logo on shirts + vests (more coverage, stronger branding)
- Logo on outerwear for cold seasons
If you're just starting with custom gear, a simple kit might be:
- 3 hi-vis shirts (plain) from our Hi-Vis Shirts Collection
- 1 hi-vis vest (with logo front and back) from our Safety Vests Collection
- 1 hi-vis hoodie (with logo on left chest) from our Hi-Vis Outerwear Collection
That gives each worker a consistent look and your company a consistent brand.
Step 5: Avoid the most common ordering mistakes
Here are issues we see small companies run into—and how to skip them:
- Ordering only one or two pieces per person — Shirts get dirty or damaged, and workers end up in non-branded or non-ANSI gear. Plan for at least 3 shirts per worker.
- Forgetting big & tall sizes — Larger or taller workers end up in gear that doesn't fit, which is both unsafe and uncomfortable. Include a full size run, including big & tall pieces, where possible.
- Skipping sample checks — Always review a sample or mockup of logo size and placement. Confirm it doesn't cover key reflective tape or visibility zones.
- Not planning for new hires — Keep a small buffer of extra branded pieces in common sizes. That way, new employees don't stand out in mismatched gear.
How to get started with custom hi-vis at Safety Apparel Zone
If you're ready to try branded hi-vis for your crew, here's a simple path:
-
Choose your base gear:
- Shirts: Hi-Vis Shirts Collection
- Vests: Safety Vests Collection
- Outerwear: Hi-Vis Outerwear Collection
- Decide logo placement: Left chest, upper back, or both — keep it clear of reflective tape
- Visit our custom page: Go to Custom Hi-Vis and send your logo file and basic info (crew size, types of jobs, climate)
- Approve proof and sizing: Review mockups and confirm size breakdown and quantities
- Outfit the crew: Hand out consistent, branded, ANSI-compliant gear and update as you add new workers or new job roles
Final thoughts
Hi-vis with your logo isn't just about looking sharp on-site—though it certainly helps. It's a practical way to:
- Strengthen safety
- Build trust with clients and general contractors
- Turn every job into advertising for your business
At Safety Apparel Zone, we're here to make the process simple, especially for small crews and growing companies. Start by picking your favorite hi-vis shirts, vests, and outerwear from our collections, then visit our Custom Hi-Vis page to get your logo on gear your crew will actually want to wear.
Share:
Hi-Vis Shirts for Summer: How to Stay Cool and Compliant on Hot Job Sites
Class 2 vs Class 3 Safety Vests: What's the Difference and Which Should You Buy?